
Resilio Sync (formerly known as BitTorrent Sync) is a P2P file transfer tool based on the torrent protocol. Its main advantages compared to classic transfer tools are speed, simplicity and the very foundation it was built on: torrent-style transfers. In simple terms, the more “nodes” you have the faster the information can be uploaded or downloaded, at the same time.
This tool works best on Linux therefore this tutorial will cover the basics of installing on Ubuntu/Debian or CentOS/RHEL.
There are 2 methods to install on linux:
1. Manual install
Depeding on the linux flavor you’re using, the packages can be downloaded and installed manually.
For Ubuntu/Debian x64 , the package can be downloaded from here
dpkg -i resilio-sync.deb
For CentOS/RHEL x64 , the package can be downloaded from here
rpm -i resilio-sync.rpm
2. Installing from repository
To install from the repos , they must first be added and then verified via the GPG key.
Debian/Ubuntu x64
First, the repo itself has to be created:
echo "deb http://linux-packages.resilio.com/resilio-sync/deb resilio-sync non-free" |
tee /etc/apt/sources.list.d/resilio-sync.list
Now for the public key:
wget -qO - https://linux-packages.resilio.com/resilio-sync/key.asc | sudo apt-key add -
And finally, the install command:
apt-get update && apt -y install resilio-sync
CentOS/RHEL
First, the repo itself has to be created:
nano /etc/yum.repos.d/resilio-sync.repo
And paste the following:
[resilio-sync]
name=Resilio Sync
baseurl=https://linux-packages.resilio.com/resilio-sync/rpm/$basearch
enabled=1
gpgcheck=1
Now for the public key:
rpm --import https://linux-packages.resilio.com/resilio-sync/key.asc
And finally, the install command:
yum -y install resilio-sync && yum update resilio-sync
To enable automatic start on startup (user rslsync):
systemctl enable resilio-sync
To uninstall:
Debian/Ubuntu
apt-get purge -y resilio-sync
CentOS/RHEL
yum -y remove resilio-sync
Tips on configuration
By default, Resilio Sync listens on localhost port 8.8.8.8. In order to grant public web access , edit the following file and set the desired public port:
nano /etc/resilio-sync/config.json
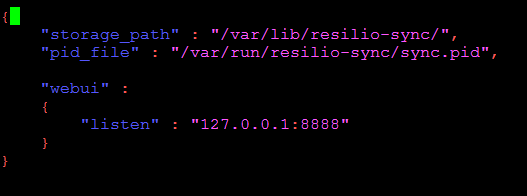
Change the IP address and desired web port to allow public access:
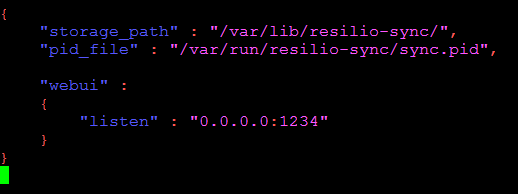
Next restart resilio-sync:
service resilio-sync restart
Don’t forget to access the web address and port immediately after resilio-sync restarted in order to set the username and password of the web interface.
*Make sure to allow the desired port in your firewall.
*By default, the download folder is set in /home/rslsync. If you wish to set a different folder, create it where you deem fit and set the permission command:
mkdir /path/to/your/folder
chown -r rslsync:rslsync /path/to/your/folder
That’s it! You now have a fully working Resilio-Sync node ready to store and sync your data across your devices at the highest speeds supported by your network and storage mediums.
Enjoy!